In this post, we are going to showcase the usage of the OSCAR Python API, implemented to interact with OSCAR clusters and its services through EGI Notebooks, a tool based on Jupyter for data analysis.
Through this post, we will create an EGI Notebook and test the OSCAR API with a simple service (cowsay service) that receives a text input and shows it on the terminal.
You can see more information about the use of EGI notebooks on https://docs.egi.eu/users/dev-env/notebooks/
Create an EGI Notebook
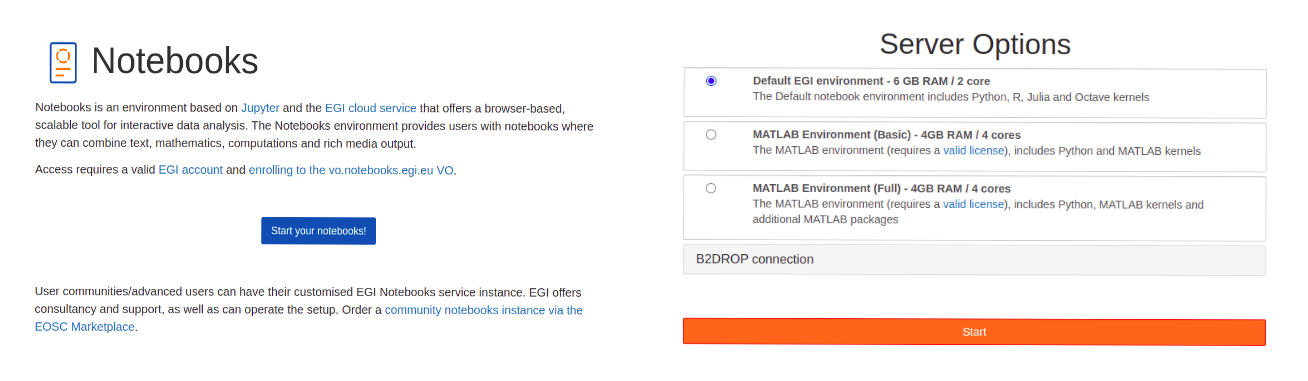
As the main page states, to create an EGI Notebook you need:
- An EGI account
- Enroll in the vo.notebooks.egi.eu VO.
If you have an EGI account but are not enrolled in the VO, you will not be able to use the Notebooks tool. However, you can reproduce these steps from any other Jupyter Notebook.
Once you meet the requirements and press the “Start your notebooks” buttons, a wizard is shown with the available environments. For this example, the default setting is enough.
Once we have our notebook, we will create the files for this example. These are the notebook file with the code that interacts with the cluster and the service files (script and FDL), as shown in the following image.
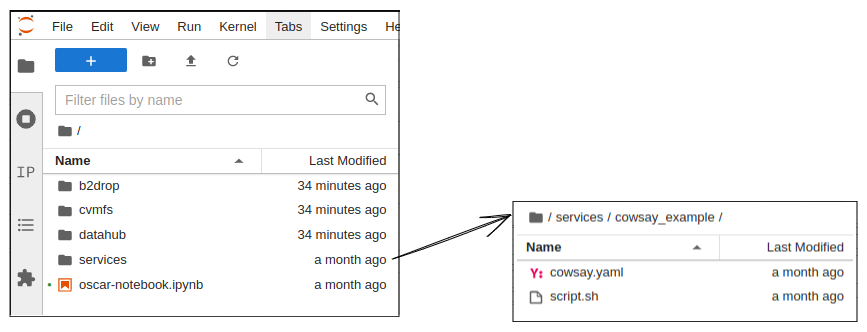
You can copy the code of each file for the example on the OSCAR API repository.
Interacting with the OSCAR cluster
Cowsay example
In this section, we will overview the code of each cell on the notebook.
The first step is to install the package from PyPI.
# Install a pip package in the current Jupyter kernel
import sys
!{sys.executable} -m pip install oscar-python
With the package installed, you can now create the client, replacing the cluster credentials, endpoint, and ID or cluster name fields for your own.
from oscar_python.client import Client

client = Client("your-cluster-id","https://your-cluster-url.net", "username", "password", True)
Once the client is created, you can call the function create_service with the path to the FDL file which contains the function definition. The cluster ID on the FDL file has to match the one provided on the client definition, otherwise, the function will throw an exception.
try:
    client.create_service("services/cowsay_example/cowsay.yaml")
    print("Service created")
except Exception as ex:
    print("Error creating service: ", ex)
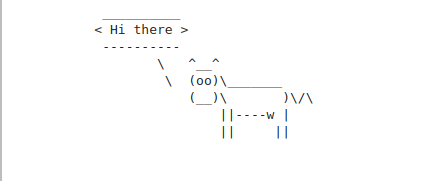
Then, you can run a synchronous invocation with the function run_service and the input parameters that the function requires, in this case a simple message.
try:
    res = client.run_service("cowsay", input = '{"message": "Hi there"}')
    if res.status_code == 200:
        print(res.text)
except Exception as ex:
    print("Error running service: ", ex)
Plants classification example
In this second example, we will overview how to use the function run service with an image as a input, for this purpose we will use the plant classification example.
First of all, we create the plant classification service using the create service function.
try:
    client.create_service("services/plant-classification-sync/plant-classification-sync.yaml")
    print("Service created")
except Exception as ex:
    print("Error creating service: ", ex)
Then, before we use the run_fuction we need to convert image current format to Base64, to do this we will import base64 library. In this case, we will use png format image.
import base64
with open('your/image/path.png', 'rb') as a binary_file:
    binary_file_data = binary_file.read()
    base64_encoded_data = base64.b64encode(binary_file_data)
    base64_message = base64_encoded_data.decode('utf-8')
    my_image_b64 = base64_message
Once the image is converted we will use the run_service function as the previous example.
try:
    res = client.run_service("plant-classification-sync", input = my_image_b64)
    if res.status_code == 200:
        print(res.text)
except Exception as ex:
    print("Error running service: ", ex)
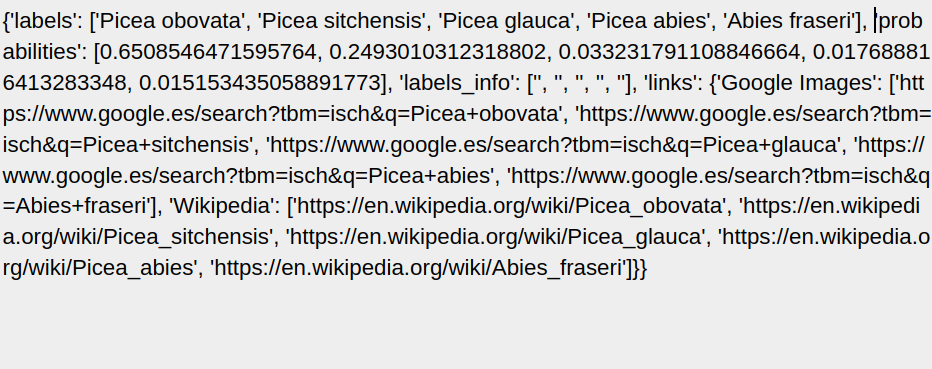
It must be noted that service response is coded in base64, so you have to decode it.
result = base64.b64decode(res.text)
print(result)