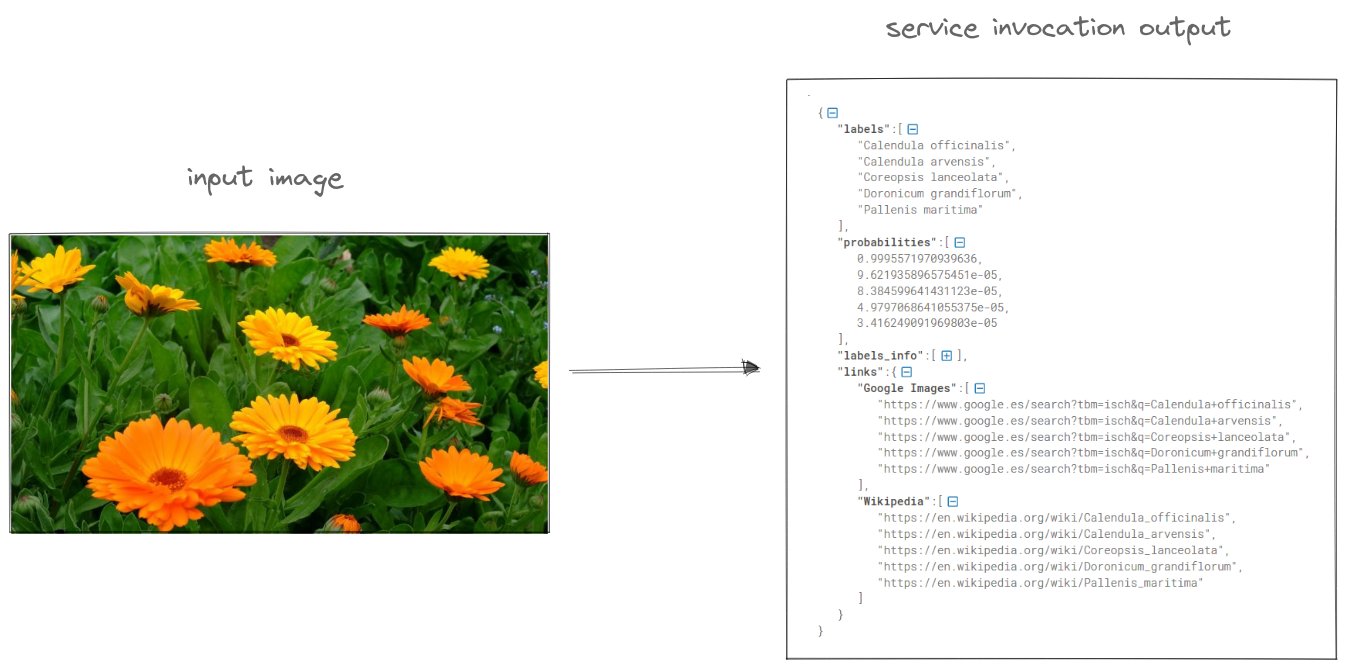
This guide aims to show the usage of the OSCAR platform for Machine Learning inference using a pre-trained Convolutional Neural network classification model by DEEP-Hybrid-DataCloud: the Plants species classifier, to classify plant pictures by specie. The PREDICT method works with an RGB image as input and returns a JSON with the top 5 predictions of the plant’s specie.
The example is going to be focused on synchronous invocations. OSCAR supports two types of invocations:
-
Asynchronous: Where users upload files to a bucket which triggers the execution of the corresponding service as a Kubernetes job, which result will be stored in a specified output bucket. An example of this type of invocation can be found on: Using OSCAR as a FaaS platform for scalable asynchronous inference of a machine learning model
-
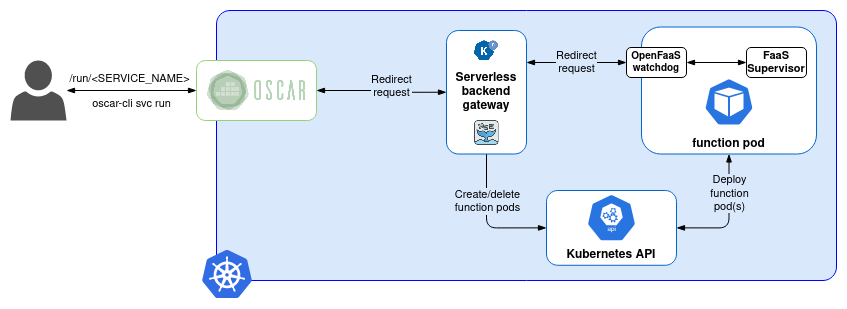
Synchronous: The user invokes the service by sending the content of the file to be processed and, instead of creating a Kubernetes job per invocation, the HTTP client, or oscar-cli, waits until the execution finishes. To manage this, a serverless backend is required, OSCAR currently supports Knative and OpenFaaS. In this method, the result file is returned in the response and, optionally, it could be stored into an output bucket.
In order to deploy the OSCAR cluster to go ahead with this example, you can either use a local deployment for testing (How to test OSCAR localy here) or the GRyCAP Infrastructure Manager’s Dashboard (IM Dashboard) (How to deploy OSCAR with the IM Dashboard here).
OSCAR services can be invoked synchronously in two ways: using the oscar-cli or making a HTTP request to the OSCAR API.
This example shows how to use oscar-cli to deploy and invoke your function. You can see how to install oscar-cli here.
Steps using oscar-cli
All the required files to deploy this example can be found on the OSCAR github repository.
Step 1: Add the cluster to the oscar-cli list of clusters.
You can add a cluster to the oscar-cli list of clusters with the command
$ oscar-cli cluster add [IDENTIFIER] [ENDPOINT] [USERNAME] {PASSWORD | --password-stdin} [flags]
where:
IDENTIFIERis the name of your cluster.ENDPOINTis the URL where OSCAR is exposed.USERNAMEandPASSWORDare the values you chose when deploying your cluster.
For example, if we have a local cluster with the name oscar-cluster and oscar as username and password (which is not a recommendable password), the command to add the cluster would look something like this:
$ oscar-cli cluster add oscar-cluster "https://localhost" oscar oscar
Step 2: Create the service(s) defined in the OSCAR’s FDL (Functions Definition Language) YAML with the following command, where FDL_FILE is the name of the FDL file.
$ oscar-cli apply FDL_FILE
In order to use the function of this example, the command would be as it follows.
$ oscar-cli apply plant-classification-sync.yaml
You can see below the definition of the service for this example, that is the content of the plant-classification-sync.yaml file, alongside with the script to be executed on the service container.
Some important things to outline on this definition:
- As you can see, there is no need to specify an input storage. This is because, as mentioned before, synchronous functions aren’t triggered by uploading files to a bucket but with an explicit request. Additionally, the storage of the output on synchronous invocations is optional, so it is not specified in this definition.
- To get the correct output, synchronous services need to set the parameter
log_level: CRITICALin order to avoid logs mixed within the output. This can also be done on the OSCAR user interface either during the service creation or afterwards by editing such service.
functions:
  oscar:
  - oscar-cluster:
      name: plant-classification-sync
      memory: 2Gi
      cpu: '1.0'
      image: deephdc/deep-oc-plants-classification-tf
      log_level: CRITICAL
      script: script.sh
#!/bin/bash

IMAGE_NAME=`basename $INPUT_FILE_PATH`
OUTPUT_FILE="$TMP_OUTPUT_DIR/$IMAGE_NAME"

# Adding the extension to the input file
mv $INPUT_FILE_PATH "$INPUT_FILE_PATH.jpg"

echo "SCRIPT: Invoked deepaas-predict command. File available in $INPUT_FILE_PATH."
deepaas-predict -i "$INPUT_FILE_PATH.jpg" -o $OUTPUT_FILE
Note: This process so far can be made with the OSCAR-UI as it is shown on the asynchronous example mentioned before.
Step 3: Invoke the function.
The command to invoke a function through OSCAR-CLI is at it follows.
$ oscar-cli service run [SERVICE_NAME] {--input | --text-input}
To invoke the example service using an image from the example repository you can run one of the following commands, depending on the way you want to get the output.
# Invocation of "plant-classification-sync" service
$ oscar-cli service run plant-classification-sync --input images/image3.jpg

# Invocation of "plant-classification-sync" service storing the result
$ oscar-cli service run plant-classification-sync --input images/image3.jpg --output image3-output.json
So, with the plant picture image3.jpg as input, the result would be a JSON such as the one shown beautified below.
Besides that, if you want to make the invocation whithin the API, you need to get first the authorization token. It can be found on the OSCAR UI by accessing the service or by command line running oscar-cli service get [SERVICE_NAME].
$ curl --insecure --request POST 'https://[CLUSTER_ENDPOINT]/run/[SERVICE_NAME]' \
--header 'Authorization: Bearer [TOKEN]' \
--data '="[FILE]"'
The requests needs as parameter the file to process encoded in base64, so following the example of a local test cluster and a service called plant-classification-sync, using image3.jpg as input, the API call would look as follows:
$ base64 images/image3.jpg | curl --insecure --request POST 'https://<YOUR CLUSTER ENDPOINT>/run/plant-classification-sync' \
--header 'Authorization: Bearer <YOUR TOKEN>' \
--data @- | base64 -d
Note:
- For more information about the usage of
oscar-clivisit OSCAR Documentation - oscar-cli - For more information about the OSCAR API visit OSCAR Documentation - OSCAR API